This one is a summary of my own experience for Sitecore Experience Commerce 9.2 Initial Release (aka Sitecore XC 9.2.0) installation on my machine. I’ve had much experience in the following ones:
- Sitecore XC9 installation
- Sitecore XC9 Update 1 installation
- Sitecore XC9 Update 2 installation
- Sitecore XC9 Update 3 installation
- Sitecore XC 9.1 Initial Release installation
so I decided to go only with:
- Installation Guide – WDP for On Premise(Thanks Sitecore team!)
I do hope that this blog post is helpful for your own journey as well.
Note: personally, I wanted to use my own install directory rather than the default one
Setup Prerequisites
Please refer to the Sitecore Experience Commerce 9 Compatibility Table for the software and version prerequisites:
- Windows 10
- Sitecore Experience Platform 9.2 Initial Release
- Sitecore Experience Accelerator 1.9.0(Note: must log into https://dev.sitecore.net/ before downloading)
- Sitecore PowerShell Extensions 5.0 for Sitecore 9.2(Note: must log into https://dev.sitecore.net/ before downloading)
- Packages for On Premise WDP 2019.07-4.0.165(Note: must log into https://dev.sitecore.net/ before downloading)
- Redis 3.0.504
Step-by-step guide
- install the ones below if not yet
- a fresh Sitecore XP 9.2 Initial Release instance, let’s say local and storefront920.xconnect.local (xConnect site)
- download and install Redis 3.0.504
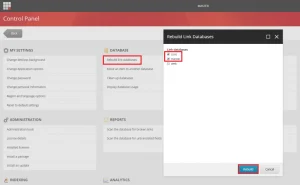
- rebuild the Link databases for the masterand core databases if not yet:
- on the Sitecore Launchpad, click Control Panel, and in the Databasesection, click Rebuild Link Databases
- select the master and core databases and then click Rebuild
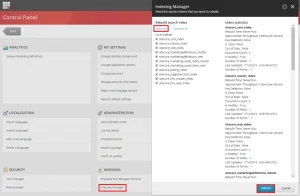
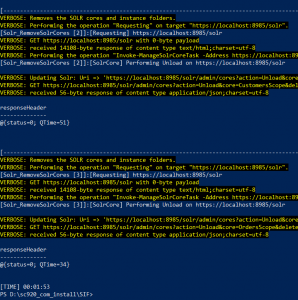
- rebuild the search indexes if not yet:
- on the Sitecore Launchpad, click Control Panel, and in the Indexingsection, click Indexing manager
- in the Indexing Manager dialog box, click Select all, and then click Rebuild
- ensure that Experience Analytics is working properly


- Note: if there is any error
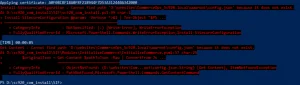
- option 1: you will have to solve it before installing XC by opening the Sitecore log and then having a look at the error messages (normally, they’re certificate issues)
- option 2: you may want to disable xDB and then fix the error later after installing XC successfully
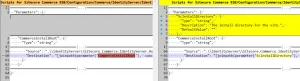
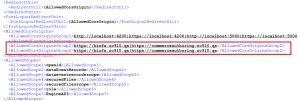
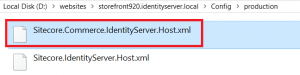
- (optional) once it’s configured for HTTPS/SSLso we should open storefront920.identityserver.localConfigproductionSitecore.IdentityServer.Host.xml and then add a new AllowCorsOriginsGroup to that file like this if not yet

- DON’T FORGET to do IIS reset
- create a new folder D:sc920_com_install
- download MSBuild Microsoft Visual Studio Web targets(available from Nuget) then extract the Web targets package, copy the toolsVSToolsPathWebMicrosoft.Web.XmlTransform.dll file into D:sc920_com_install
- download Sitecore Experience Accelerator 1.9.0 for Sitecore 9.2(Note: must log into https://dev.sitecore.net/ before downloading) and put it into D:sc920_com_install
- download Sitecore PowerShell Extension 5.0 for Sitecore 9.2then put it into D:sc920_com_install
- download and unzip Packages for On Premise WDP 2019.07-4.0.165(Note: must log into https://dev.sitecore.net/ before downloading) then put it into D:sc920_com_install
- unzip D:sc920_com_installSitecore.Commerce.3.0.28and then rename D:sc920_com_installSIF.Sitecore.Commerce.3.0.28 to D:sc920_com_installSIF for a better practice
- override the following filesin order to inject the custom install directory of Sitecore Identity Server
- open raw and then copy / paste jsoninto D:sc920_com_installSIFConfigurationCommerce
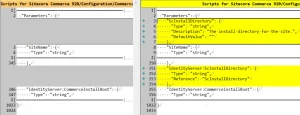
- open raw and then copy / paste Config.jsoninto D:sc920_com_installSIFConfigurationCommerceIdentityServer
- (optional)download + unzip zip and then copy / paste all to D:sc920_com_installSIF
- Note: we cannot use CommerceInstallRootparameter in this case, otherwise you may get the issue “Cannot find path CommerceOps_Sc920.localwwwrootconfig.json because it does not exist”
- download ps1and put it into D:sc920_com_installSIF then open it to correct the following parameters:
- $SiteNamePrefix
- $ScInstallDirectory
- $SiteHostHeaderName
- $SqlServer
- $SqlUser
- $SqlPass
- $SolrUrl
- $SolrRoot
- $SolrService
- (optional)correct the SitecoreUserName and SitecoreUserPassword of your Sitecore XP 9.2.0 instance if you’re using others rather than the default ones

- (optional) you can specify any local account (note: it will be created automatically if non-existent)to be set up for the various application pools that are created as part of the deployment at line 83-84 of ps1

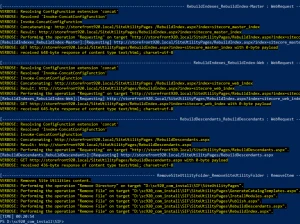
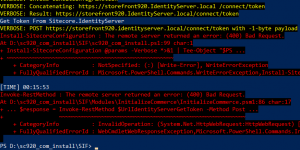
- let’s install it
- Note: ensure that there is NOcustom AllowedCorsOriginsGroup in D:sc920_com_installSIFIdentityServerSitecore.Commerce.IdentityServer.Host.xml (they’re added automatically in prior installations)
- launch PowerShell as an administrator
- change directory to D:sc920_com_installSIF
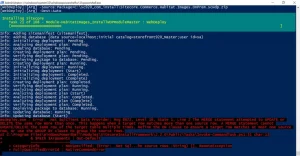
- execute .sc920_com_install
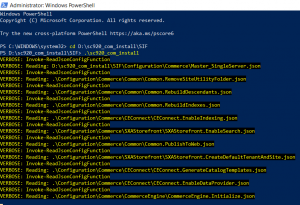
- hopefully there is nothing can stop the installation process now
- Note: ensure that there is NOcustom AllowedCorsOriginsGroup in D:sc920_com_installSIFIdentityServerSitecore.Commerce.IdentityServer.Host.xml (they’re added automatically in prior installations)
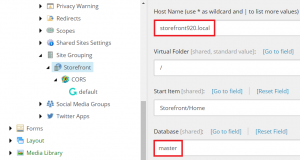
- open a browser then navigate to https://storefront920.local/, you would see the default page of Sitecore website. That’s because we don’t use the default host name storefront.comso we need to correct it via Sitecore
- log into https://storefront920.local/sitecore/
- access /sitecore/content/Sitecore/Storefront/Settings/Site Grouping/Storefront
- update Host Nameto local and Database to master
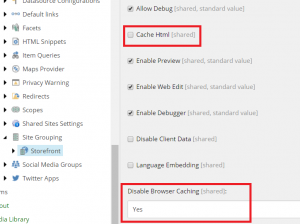
- (optional) not check the checkbox Cache Htmland select Yes for Disable Browser Caching for a better practice
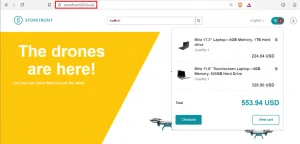
- refresh https://storefront920.local/and then add some products, you would see something like this
- DO NOTforget to perform Post-Installation Steps
- follow Post-Installation Steps(from Page 19) in Installation Guide – WDP for On Premise
The recommendation
We can remove the modules completed from D:sc920_com_installSIFConfigurationCommerceMaster_SingleServer.json and re-do Step 16 if there is something wrong (especially for Note: some known issues below) so that we are able to save a lot of time
How to uninstall it?
- open D:sc920_com_installSIFps1and uncomment the line 103 + comment out the line 100 then save it

- Note: DO NOT FORGETto restore D:sc920_com_installSIFConfigurationCommercejson if you already edited it for removing the modules completed via the install operations
- open Windows PowerShell (run as administrator)
- change directory to D:sc920_com_installSIF
- execute .sc920_com_install
- hopefully, it runs well and cleans everything up
Note: some known issues
- The service cannot accept control messages at this time
- my suggestion: access IIS, start localsite and storefront920.local application pool manually (note: you may need to do it several times) if they’re in STOP status, somehow IIS cannot restart those ones after stopping them
- App Pool ‘storefront920.local’ has stuck in Stopping state

- my suggestion: access IIS, start localsite and storefront920.local application pool manually (note: you may need to do it several times) if they’re in STOP status, somehow IIS cannot restart those ones after stopping them
- The remote server returned an error : (400) Bad Request
- my suggestion 1: you should perform Step 12 or ensure that storefront920.identityserver.localConfigproductionSitecore.Commerce.IdentityServer.Host.xmlis existent
- my suggestion 2: try doing IIS Reset and then perform the current install step again
- Cannot validate argument on parameter ‘Source’. The ” Test-Path $_ ” validation script for the argument with value “D:sc920_com_installSIFSiteUtilityPages” did not return a result of True

- somehow SiteUtilityPagesfolder is removed after performing some tasks so we have to restore it by copying SiteUtilityPages from Sitecore.Commerce.3.0.28.zip and then paste it to D:sc920_com_installSIF
- The MERGE statement attempted to UPDATE or DELETE the same row more than once
- my suggestion is to remove all prior modules completed + Module-HabitatImages itself (in this case) from D:sc920_com_installSIFConfigurationCommercejson and re-do Step 16
Got issues?
Please send your issues (with screenshots if possible) to [email protected] so that I have a chance to understand your problem and be able to suggest the solution.
Happy Sitecore Commerce Installation!
This article originally appeared on Walking on clouds (https://buoctrenmay.com/).